A Kitchen-Table Dyepot: Giving Onion Skins, Tea Bags and Avocado Stones a Second Life
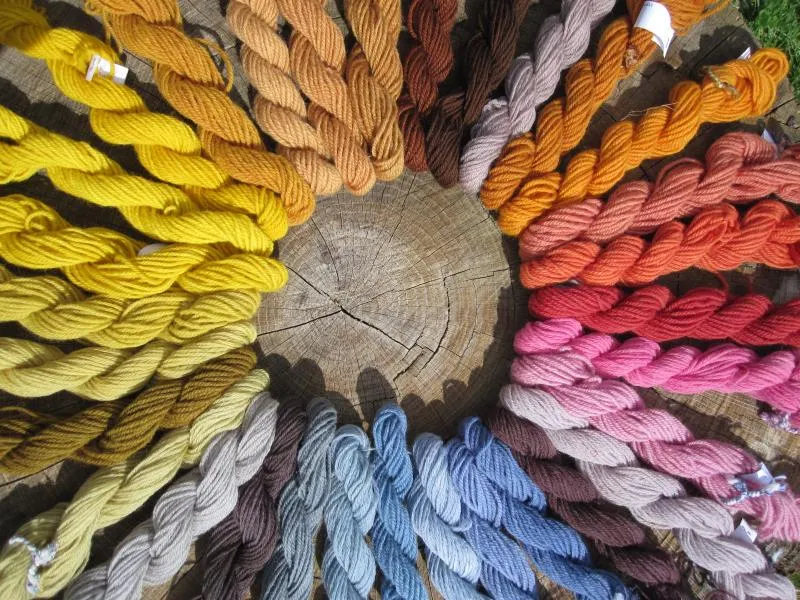
Photo: Roued, CC BY-SA 2.0, via Wikimedia Commons
Natural dyeing has a reputation for being fiddly and faintly mysterious: powders in labelled jars, simmering pots, a shed full of equipment you are not quite sure how to use. But it can begin much closer to home. The papery brown skins from a net of onions, the tea bags left draining by the sink, the avocado stones saved from breakfast — all of these hold colour. The kitchen table is enough. So is a damp November afternoon and a willingness to see what comes out of the pot.
Start with what the kitchen already holds
Brown onion skins are the classic first dye. They give warm, honeyed yellows through to soft copper, depending on how many you save and how long you simmer them. Used tea bags — ordinary black tea, not the fancy fruit infusions — make a gentle beige or mushroom tone. Avocado stones, simmered and strained, can produce a quiet blush pink, especially on wool. Oak leaves gathered from a park path in autumn will take you towards grey-brown and olive, the colours of a hedgerow in retreat.
This is the harmony part. You are not importing colour from a supplier; you are noticing what is already passing through your kitchen and giving it a second life. There is something quietly satisfying about a wool scarf that began as last week's onions.
What you need, and what you do not
You do not need a dedicated dye studio. You do need a saucepan that will never be used for food again — charity shops are excellent for this — and a wooden spoon or long-handled utensil kept only for dyeing. Wear gloves, open a window, and keep the pot away from children and pets while it is hot. Natural does not automatically mean risk-free: some plants can irritate skin, and mordants deserve respect. Label your dye pot clearly and store it away from the kitchen once you are finished.
For the fibre, a small quantity is plenty for a first attempt: 100g of wool yarn, a lightweight wool scarf, a cotton tote or a handful of linen scraps. Animal fibres such as wool take natural colour more readily than plant fibres like cotton or linen. If you want a deeper, more reliable result on cotton, you will need a mordant and a little more patience.
A mordant is simply a mineral fixative that helps the colour cling to the fibre. Alum is the usual starting point for beginners, often used with a pinch of cream of tartar. Follow the supplier's instructions exactly, weigh your fibre, and do not guess. If you would rather skip that step for now, buy pre-mordanted wool or accept that your first cotton tote may come out pleasingly pale.
One small dyepot, step by step
Let us imagine a simple onion-skin bath for a wool scarf.
First, save the dry brown skins from three or four onions. You want roughly a generous handful, loosely packed. Put them in your dye pot with enough water to cover the fibre generously, bring to a gentle simmer and hold it there for about 30 to 45 minutes. The water will turn a rich amber. Turn off the heat and let it cool a little, then strain out the skins through a sieve or muslin. Compost them.
While the dye cools, soak your wool scarf in warm water with a drop of mild washing-up liquid, then rinse it gently. Squeeze, do not wring. If you are using alum, mordant the scarf according to the instructions before dyeing; if you are using pre-mordanted wool, simply move on.
Add the damp scarf to the warm dye bath. Keep the heat low — a gentle steam, not a rolling boil, which can felt wool. Stir softly and infrequently. After 30 minutes, check the colour by lifting a corner. Remember that wet wool looks darker than dry wool. If you want more depth, leave it longer. Then turn off the heat and let the scarf cool in the pot. Overnight is ideal. This is not a delay; it is part of the process. The colour keeps settling while you sleep.
The next day, lift the scarf out, squeeze gently and rinse in water that is the same temperature as the dye bath, gradually cooling it. Hang it in the shade to dry. Do not be alarmed if the first rinse is coloured; some loose dye is normal. A final cool rinse with a little wool wash will help.
Honest expectations, kindly held
Natural dyeing is not a precise craft, and that is both its charm and its challenge. Your onion-skin yellow may be a pale butter colour rather than a deep ochre. Your tea-bag beige may look almost grey on cotton. Avocado stones can give a beautiful blush on wool and very little on linen. Oak leaves may surprise you with a soft green-brown that looks nothing like the leaf.
Lightfastness varies too. Some natural colours fade gracefully in sunlight; others are more stubborn. Store finished pieces away from direct sun and wash them gently, by hand, with a pH-neutral soap. Think of the colour as a living thing rather than a commercial finish.
First projects worth the wait
A wool scarf is forgiving because wool takes colour beautifully and small variations look intentional. A cotton tote is a good next step if you are prepared to mordant it and accept a softer shade. Linen scraps are lovely for patchwork — dye a few pieces in different baths and let the differences do the work. A jar of tea-dyed linen beside a jar of onion-skin wool is its own small exhibition.
Set the jars on a windowsill. Label them with the date and what went into the pot. In time, you will build a little kitchen archive of colour: the onion harvest of one week, the avocado stones of another, the oak leaves from a particular walk.
The pleasure is in the pause
We are so used to craft projects that reward us immediately. Natural dyeing asks for something else: a slow simmer, a cooling pot, an overnight wait, a colour that reveals itself gradually. That pause is not a flaw in the method. It is the method. While the pot steams, you can read a few pages, tidy the table, or simply watch the rain against the window. The wool is taking on colour at its own pace. You are allowed to do the same.
Make slowly. Make well. Make for joy — and let the onion skins do their quiet work.